Remember those iconic fruit roll-ups from childhood? The brightly colored, chewy strips that made snack time a blast? While the nostalgia is real, the ingredient list on most store-bought versions often tells a different story – one filled with corn syrup, artificial flavors, and questionable additives. But what if we told you that you can recapture that childhood joy with a significantly healthier twist? Enter homemade fruit roll ups: an incredibly easy, oven-baked treat made with pure, wholesome fruit, perfect for satisfying both kids and adults.
Making your own fruit roll-ups isn't just about avoiding processed ingredients; it's about embracing simplicity, maximizing natural flavors, and creating a truly nutritious snack. Forget needing a fancy dehydrator or a culinary degree; all you really need is fruit, an oven, and a little patience. This guide will walk you through transforming fresh or frozen fruit into delicious, chewy fruit leather that your whole family will love.
Why Ditch Store-Bought for Homemade Fruit Roll Ups?
For many of us, fruit roll-ups were a staple in lunchboxes and after-school routines. They were fun, flavorful, and incredibly convenient. However, a quick glance at the typical store-bought fruit snack reveals a concoction far removed from actual fruit. Main ingredients frequently include corn syrup (often high-fructose), various fruit purees (often from concentrate), maltodextrin, artificial colors, and natural and artificial flavors. These ingredients can contribute to unnecessary sugar intake, potential allergic reactions, and a general lack of nutritional value.
The beauty of crafting your own homemade fruit roll ups lies in complete ingredient transparency. You control what goes in, and often, it's just one or two simple items. Imagine a snack made from just strawberries, or a vibrant mango puree, perhaps with a squeeze of lemon for brightness and a touch of honey for natural sweetness if your fruit isn't perfectly ripe. This minimal ingredient list ensures you're providing a snack that’s genuinely healthy, packed with vitamins, and free from the hidden sugars and artificial additives that plague their commercial counterparts. It’s a game-changer for parents seeking nutritious alternatives and for anyone wanting to make healthier fruit roll ups and ditch corn syrup for real fruit snacks.
The Simple Magic of Oven-Baked Fruit Roll Ups: No Dehydrator Needed!
One of the most common misconceptions about making fruit leather is the need for specialized equipment. Many assume you need a food dehydrator to achieve that perfectly chewy, flexible texture. Thankfully, that's simply not true! Your standard kitchen oven is more than capable of doing the job, and it does so with surprising ease. The secret lies in a "low and slow" baking method, which gently removes moisture from the fruit puree without actually cooking it in the traditional sense.
This gentle dehydration process concentrates the fruit's natural sugars, intensifying its flavor and transforming it into a naturally sweet, pliable snack. The result is a vibrant, chewy fruit leather that's incredibly satisfying. Whether you choose succulent strawberries, tropical mangoes, ripe peaches, or a medley of berries, the process remains largely the same. You're not baking the fruit until it's crispy; rather, you're slowly evaporating its water content until it reaches that familiar, slightly tacky, yet completely dry and flexible consistency. This oven-baked method makes homemade fruit roll ups accessible to everyone, regardless of their gadget collection.
Crafting Your Perfect Homemade Fruit Roll Ups: A Step-by-Step Guide
Creating your own delicious fruit roll-ups is a straightforward process that yields incredibly rewarding results. Here's how to turn your favorite fruit into a delightful, chewy snack:
1. Prepare Your Fruit
- Choose Wisely: Opt for ripe, soft fruit for the best flavor and smoothest puree. Strawberries, mangoes, peaches, raspberries, blueberries, and apples work wonderfully.
- Fresh or Frozen: Both are great! If using frozen fruit, simply thaw it completely and drain any excess liquid before blending. This prevents your puree from being too watery.
2. Blend to Perfection
- Puree Power: Add your chosen fruit to a food processor or high-speed blender. Blend until it's completely smooth, with no chunks or visible pulp. Aim for a consistency similar to applesauce.
- Optional Enhancements: For some fruits (like apples or peaches), a tiny squeeze of lemon juice can brighten the flavor and prevent browning. If your fruit isn't super sweet, a tablespoon of honey or maple syrup can be added, though often it’s not needed. Many prefer to make one-ingredient fruit roll ups that are healthy, oven-baked & sugar-free by simply using the fruit itself.
3. Preheat and Prepare Your Pans
- Low and Slow: Preheat your oven to its lowest possible setting, typically around 175°F (80°C). Consistency in low heat is crucial for dehydration.
- Line It Up: Line a baking sheet (or two, if making a larger batch) with parchment paper or a silicone baking mat. A good quality silicone mat can be easier to peel from later. Avoid using aluminum foil directly, as the fruit can stick.
4. Spread it Thin
- Even Layer: Pour the fruit puree onto your prepared baking sheet. Using an offset spatula or the back of a spoon, spread it out into a thin, even layer. The thinner and more uniform the layer, the faster and more evenly it will dry. Aim for about ⅛ to ¼ inch thickness. Avoid pooling at the edges.
5. Dehydrate in the Oven
- Bake Time: Place your baking sheet(s) in the preheated oven. Bake for approximately 3 to 4 hours, or until the fruit leather feels dry to the touch but is still flexible and slightly tacky, like a sticky note. The exact time will vary based on your oven, the fruit's water content, and the thickness of your spread.
- Check for Doneness: Gently touch the center of the fruit leather. If it feels wet or very sticky, continue dehydrating. You're looking to remove moisture, not brown or crisp the fruit. If the center remains tacky after significant time, it might have been spread too thick. You can carefully peel the entire sheet, flip it over, and continue dehydrating for a short while on the other side.
6. Cool, Cut, and Roll
- Cool Down: Once done, remove the fruit leather from the oven and let it cool completely on the baking sheet. It will become firmer as it cools.
- Prep for Rolling: Once cool, lay a piece of wax paper or parchment paper over the fruit leather. Carefully peel the fruit leather off the baking sheet (it should come off easily, especially with parchment or silicone). The wax paper will prevent it from sticking to itself when rolled.
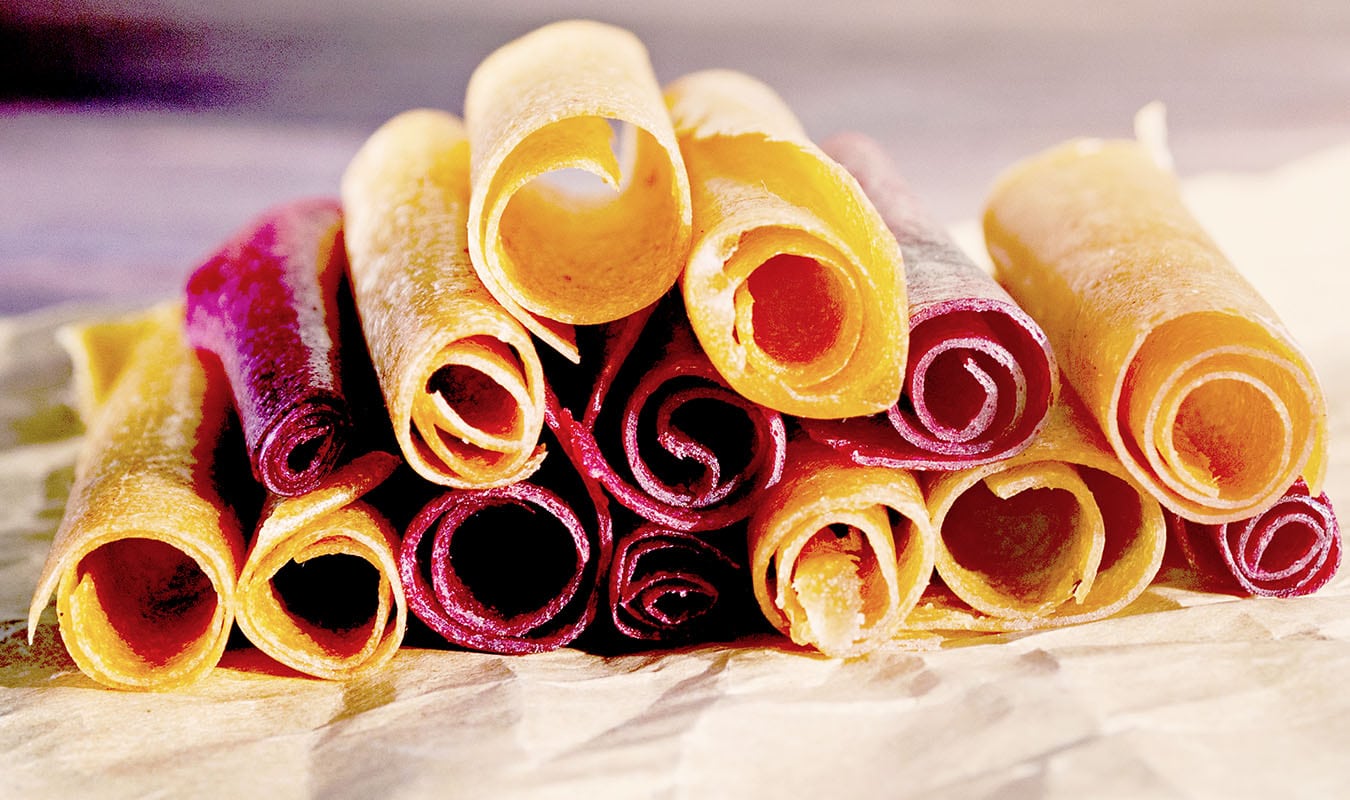
- Cut and Store: Use kitchen scissors or a pizza cutter to cut the fruit leather into strips, spirals, or fun shapes. Roll each strip up with the wax paper inside. Store your homemade fruit roll ups in an airtight container at room temperature for up to a week, or in the refrigerator for longer freshness.
Endless Flavor Adventures: Customizing Your Homemade Fruit Roll Ups
The beauty of making your own homemade fruit roll ups lies in the endless possibilities for customization. While classic flavors like strawberry and mango are always a hit, don't be afraid to experiment with other fruits and combinations:
- Berry Blast: Mix strawberries, raspberries, and blueberries for a vibrant, antioxidant-rich roll-up.
- Tropical Tango: Combine mango, pineapple, and a hint of passion fruit for an exotic twist.
- Orchard Fresh: Apple puree (cooked and cooled first) with a dash of cinnamon makes a comforting, autumnal snack. Peach and apricot are also excellent choices, though their higher water content might require a slightly longer drying time.
- Citrus Zing: A tiny bit of orange or lime zest can elevate the flavor profile of almost any fruit blend, adding a bright, aromatic note.
- Spice it Up: Don't just stick to fruit! A pinch of cinnamon, nutmeg, or even a tiny amount of ginger can add unexpected depth to apple or pear fruit leather.
Remember that fruits with higher water content (like watermelon or grapes) might take considerably longer to dry and can sometimes be more challenging to get to the perfect chewy consistency without becoming brittle. Stick to fruits like berries, mangoes, peaches, and apples for your first few attempts. This snack is incredibly kid-friendly, not just in consumption but in creation too! Involve your children in blending the fruit (with supervision) or helping to cut and roll the strips. It's a fantastic way to introduce them to healthy eating habits and the joy of making food from scratch.
Conclusion
There's immense satisfaction in recreating a beloved childhood snack, especially when you can make it healthier, tastier, and free from artificial ingredients. These easy oven-baked fruit roll ups are a testament to how simple ingredients and a little patience can transform into a truly delightful, kid-approved treat. They're perfect for lunchboxes, after-school snacks, or simply a guilt-free sweet indulgence. So, ditch the corn syrup and artificial flavors, and embrace the vibrant, natural goodness of homemade fruit leather. Your taste buds, and your family, will thank you!
